
The Ultimate Guide to Trading on Binance Futures
Main Takeaways
Before trading Binance Futures, you should get well acquainted with how the platform works and all its features.
In our guide, we review the main questions and settings you’ll encounter while trading Binance’s perpetual futures product.
Always keep in mind the risks associated with trading futures. Ensure you are sufficiently prepared and knowledgeable about how futures work before trading them.

For anyone interested in trading futures, there’s a lot to learn. You’ll need to carefully study technical skills and the underlying trading concepts before jumping in. At first glance, the Binance Futures UI can look intimidating, but with the following guide, you’ll soon begin recognizing its key features and facets.
How to Open a Binance Futures Account
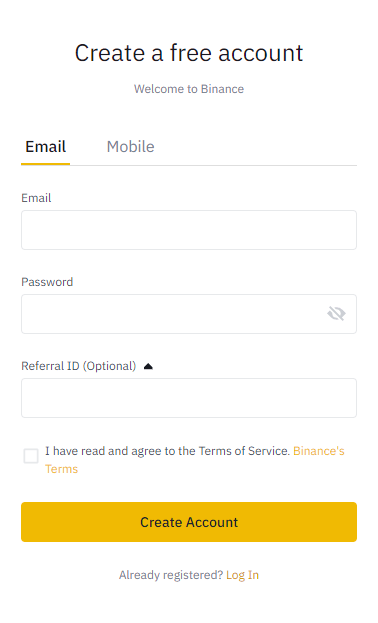
Before opening a Binance Futures account, you need a regular Binance account. If you don’t have one, you can go to Binance and click on Register in the top right corner of your screen. Then follow these steps:
Enter your email address and create a safe password. If you have a referral ID, paste it into the referral ID box. Click [Create Account] to continue.
You will receive a verification email shortly. Follow the instructions in the email to complete your registration.
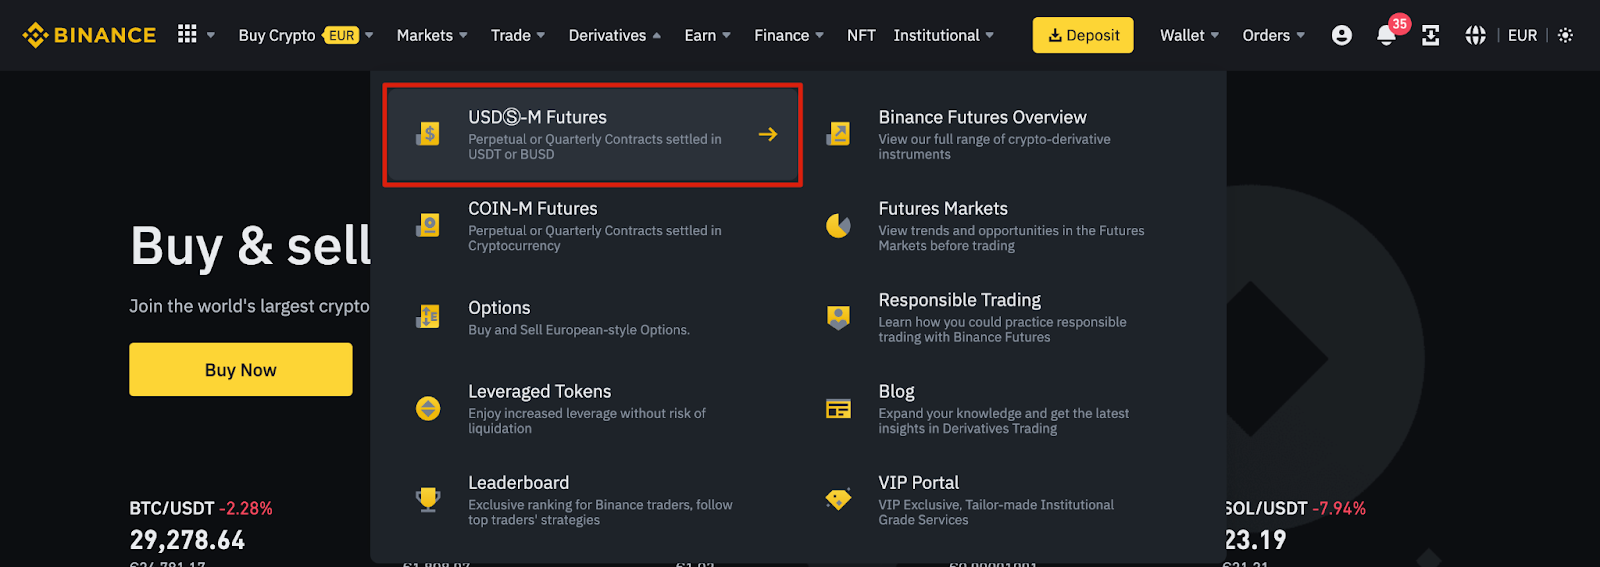
Next, log in to your Binance account, move your mouse to the bar at the top of the page on [Derivatives], and click on USD(S)-M Futures.
Click on the [Open now] button to activate your Binance Futures account. You’ll now be able to trade futures products on Binance. Note that you should still prepare and educate yourself before you can responsibly use the product.

If you’re new to trading futures, refer to the Binance Futures FAQ for an overview of the contract specifications on offer. If you’d like to test out the platform without risking real funds, you can also try out the Binance Futures testnet.
How to Fund Your Binance Futures Account
To fund your Futures account, you’ll first need to make sure you have funds available in your Binance account you can transfer over. These funds could be in your Funding, Fiat and Spot, Margin, or Options wallet. If you don’t have any funds deposited to Binance, we recommend reading our How to Deposit on Binance guide.
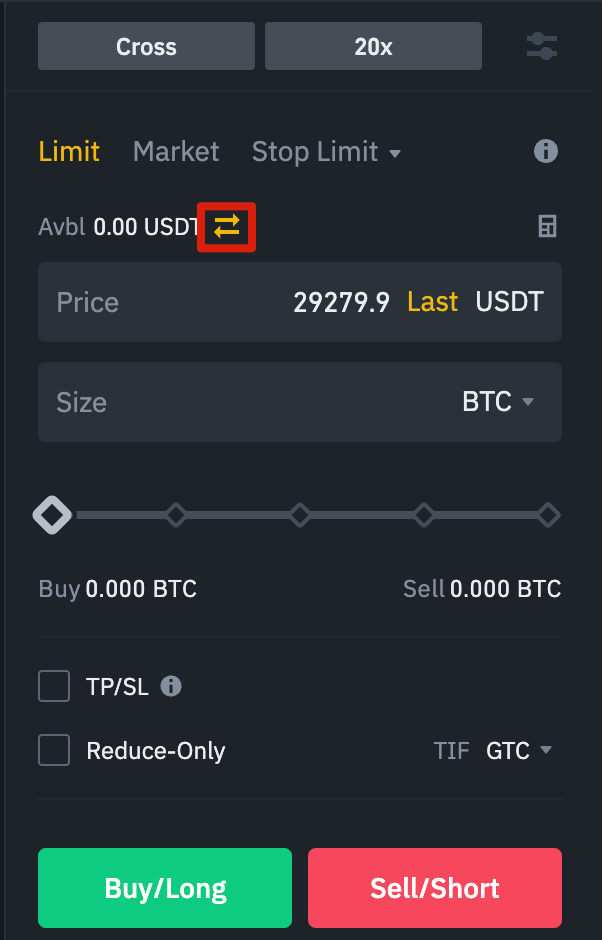
To transfer funds to your Futures Wallet, click on the transfer icon on the right side of the Binance Futures page.
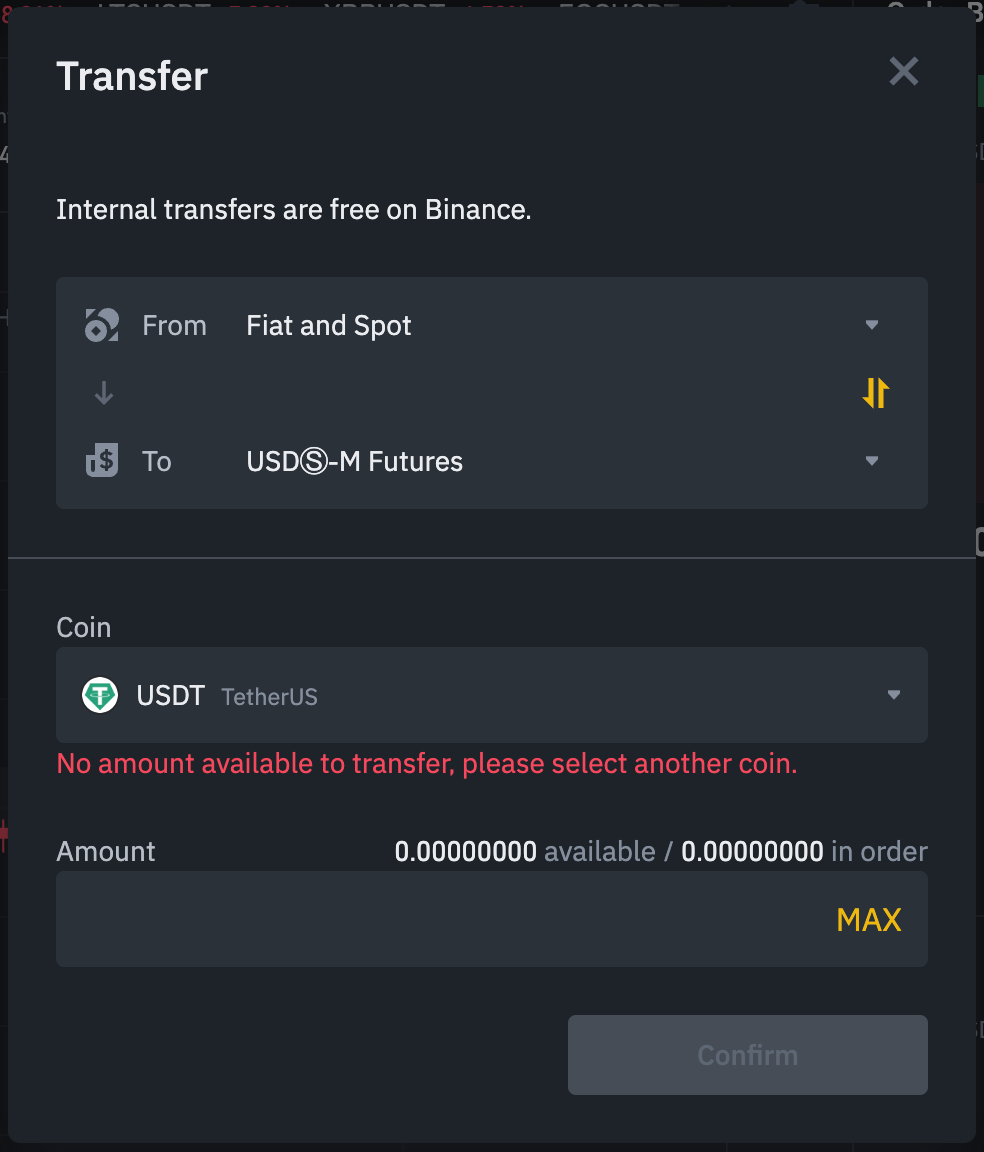
Set the amount you’d like to transfer and the wallet you want to use before clicking [Confirm]. You should see the balance added to your Futures Wallet shortly. You can also change the direction of the transfer should you wish.
Understanding the Binance Futures Interface
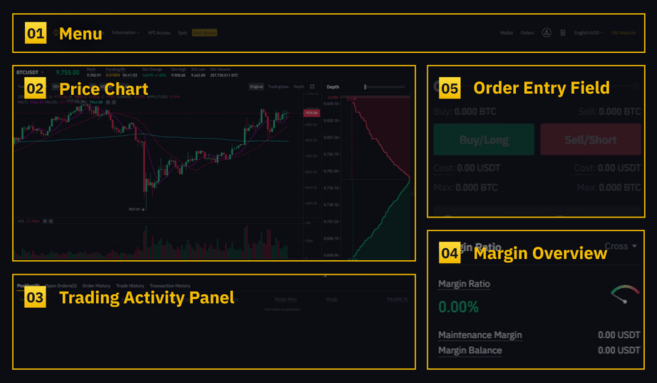
1. In the [Menu] area, you’ll find links to other Binance pages, such as COIN-M Futures, Options, Strategy Trading, and Activities. Under the [Information] tab, you can find links to Futures FAQ, API Access, funding rate, index price, and other market data.
On the right side of the top bar, you can access your Binance account. You can easily check your wallet balances and orders across the entire Binance ecosystem.
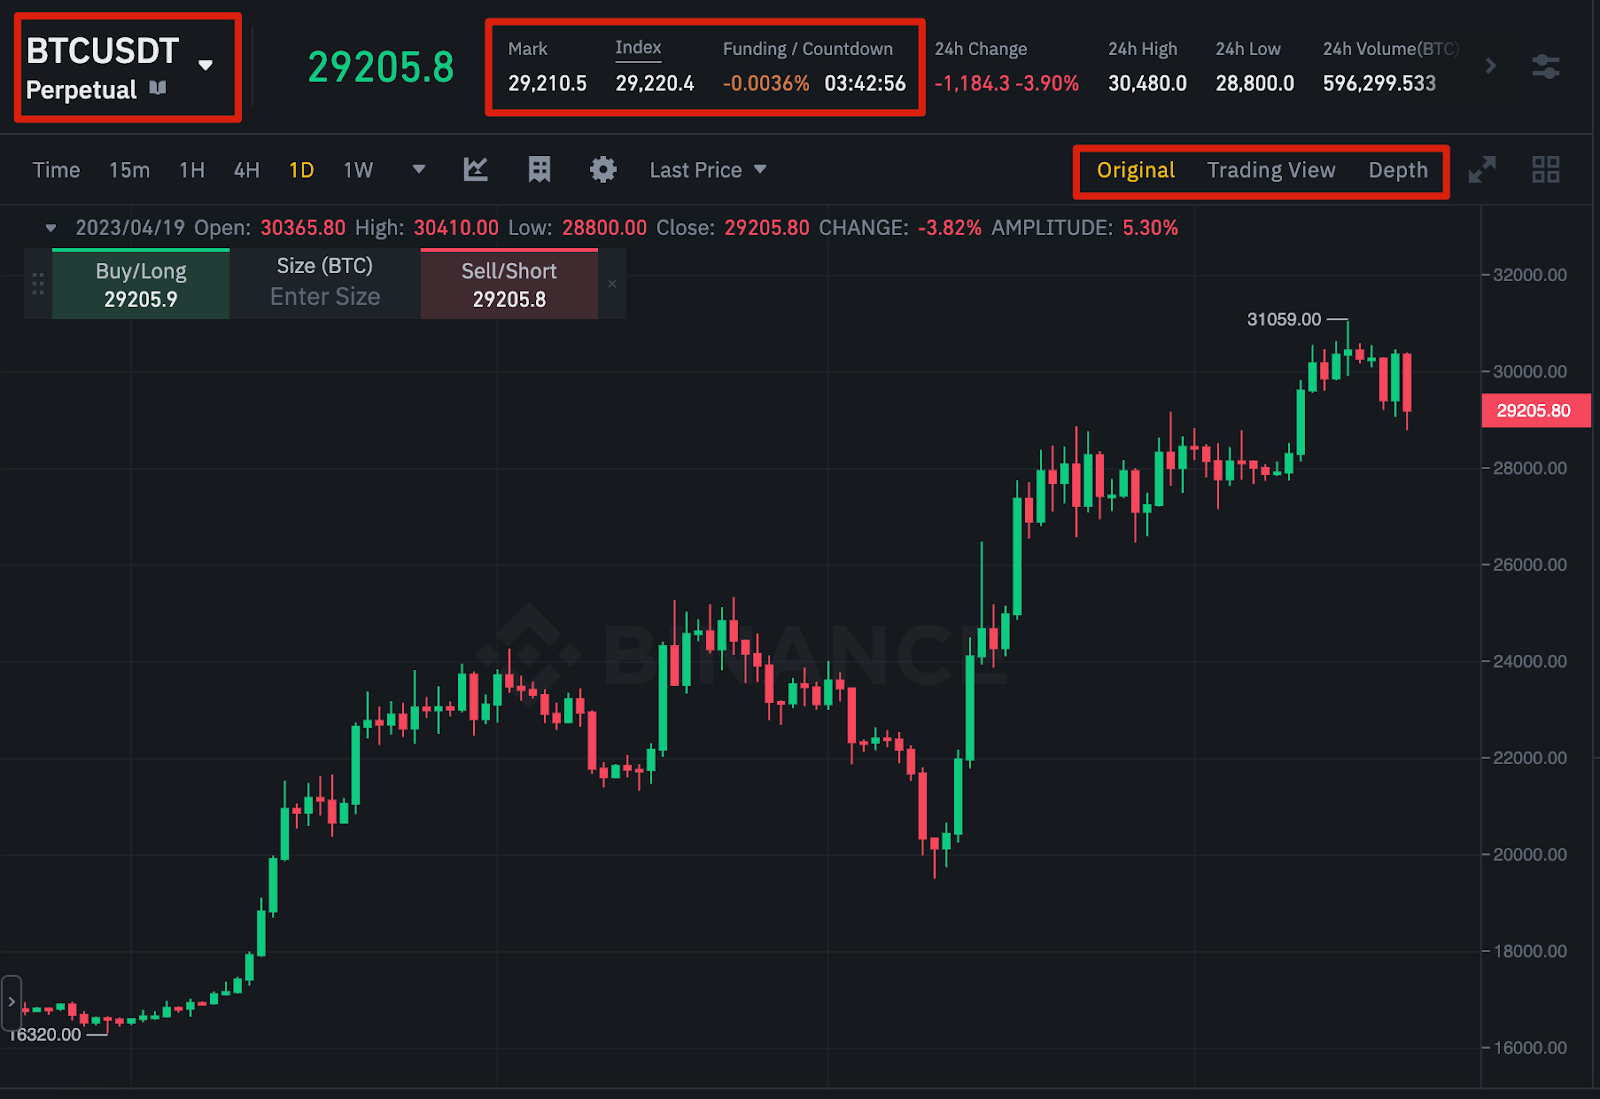
2. In the [Price Chart] section, you can:
Choose a contract by hovering over the current contract’s name (BTCUSDT by default).
Check the Mark Price. This is especially important to note, as liquidations happen based on the Mark Price.
Check the expected funding rate and a countdown until the next funding round.
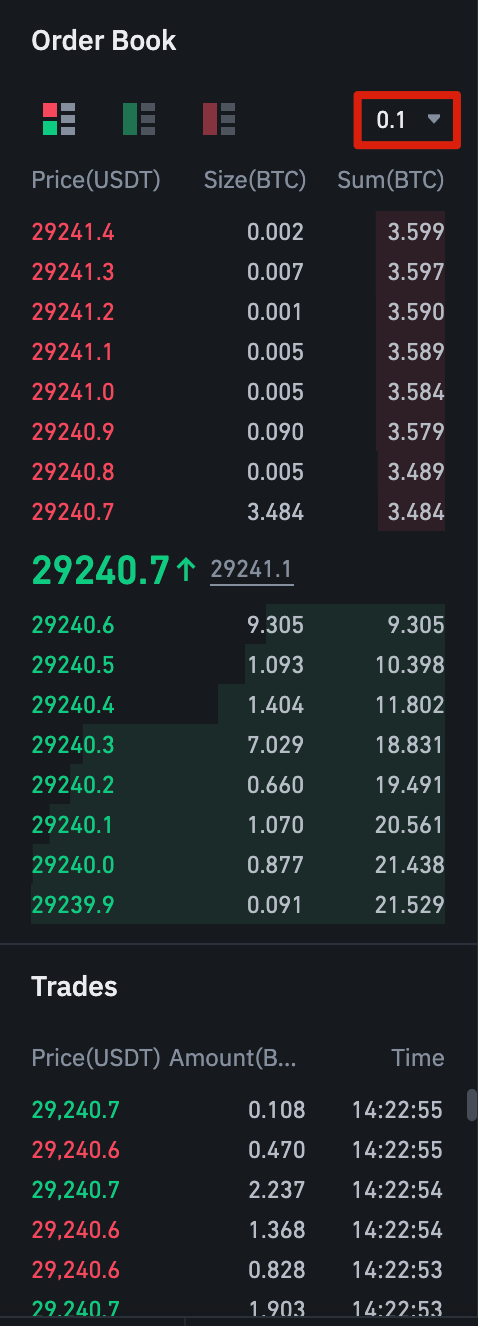
See your current chart. You can switch between the Original or the integrated TradingView chart. You’ll get a real-time display of the current order book depth by clicking on [Depth].
See live order book data. You can adjust the accuracy of the order book in the dropdown menu in the top right corner of this area (0.01 by default).
See a live feed of previously executed trades on the platform.
3. The [Trading Activity Panel] lets you monitor your futures trading activity. You can switch tabs to check your position’s current status and your currently open and previously executed orders. You can also get a full trading and transaction history for a given period.
This section is also where you can monitor your position in the auto-deleverage queue under ADL. This is especially important to pay attention to during periods of high volatility.

4. In the [Margin Overview] section, you can check your available assets, transfer, and buy more crypto. This is also where you can view information relating to the current contract and your positions. Be sure to keep an eye on the margin ratio to prevent liquidations.
By clicking on [Transfer], you can transfer funds between your Futures Wallet and the rest of the Binance ecosystem.

5. The [Order Entry] field is where you’ll input your Buy/Long and Sell/Short orders. You can find a detailed explanation of the available order types further down in this article. You can also switch between Cross Margin and Isolated Margin at the top of the view. If you want to adjust your leverage, clicking on your current leverage amount (20x by default).

In all of these modules/sections, you can resize the element to your liking. Whenever you see an arrow on the bottom right corner of a module, you can drag it to your preferred layout. This way, you can easily create your own custom interface.
How to Adjust Your Leverage
Binance Futures allows you to manually adjust the leverage of each contract. To choose a specific contract, go to the top left of the page and hover over the current contract (BTCUSDT by default).

To adjust the leverage, go to the [Order Entry] section field and click on your current leverage amount (20x by default). You can specify the amount of leverage by adjusting the slider, or by typing it in, and clicking on [Confirm].

Note that the larger the position size is, the smaller the amount of leverage is that you can use. Similarly, the smaller the position size, the larger the leverage you can use. Using higher leverage also carries a higher risk of liquidation.
As always, every trader should carefully consider the amount of leverage that they use and its associated risk.
What Is the Difference Between the Mark Price and Last Price?
To avoid spikes and unnecessary liquidations during periods of high volatility, Binance Futures uses a last price and mark price.
The last price is easy to understand. It means the last price the contract was traded at. In other words, the last trade in the trading history defines the last price. It’s used for calculating your realized PnL (Profit and Loss).
The mark price is designed to prevent price manipulation. It’s calculated using a combination of funding data and a basket of price data from multiple spot exchanges. Your liquidation prices and unrealized PnL are calculated based on the mark price.

Note that the mark price and the last price may differ.
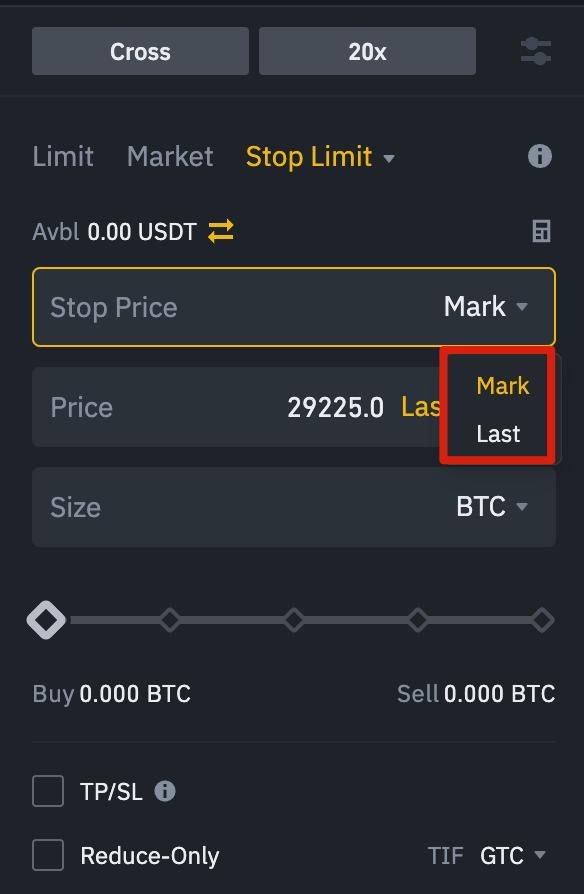
Setting stop price triggers
When setting an order type that uses a stop price as a trigger, you can select either the last price or the mark price as the trigger. To do this, select the price you wish to use in the [Trigger] dropdown menu at the bottom of the order entry field.
What Order Types Are Available and When to Use Them?
When placing your orders, you have a range of options to choose from:
Limit Order
A limit order is an order placed on the order book with a specific limit price. When you place a limit order, the trade will only be executed if the market price reaches your limit price (or better). You can use limit orders to potentially buy at a lower price or to sell at a higher price than the current market price.
Market Order
A market order is an order to buy or sell at the best available current price. It is executed against the limit orders previously placed on the order book. When placing a market order, you will pay fees as a market taker.
Stop-Limit Order
The easiest way to understand a stop-limit order is to break it down into its stop price and limit price. The stop price is the price that triggers the limit order, and the limit price is the limit price of the triggered limit order. This means that once your stop price has been reached, your limit order will be immediately placed on the order book.
Although the stop and limit prices can be the same, this is not a requirement. In fact, you could set the stop price (trigger price) a bit higher than the limit price for sell orders or a bit lower than the limit price for buy orders. This could increase the chances of your limit order filling after reaching the stop price.
Stop Market Order
Similar to a stop-limit order, a stop market order uses a stop price as a trigger. However, when the stop price is reached, it triggers a market order instead.
Take-Profit Limit Order
A take-profit limit order is similar to a stop-limit order. It involves a trigger price, the price that triggers the order, and a limit price, the price of the limit order that is then added to the order book. The key difference between a stop-limit order and a take-profit limit order is that a take-profit limit order can only be used to reduce open positions.
A take-profit limit order can be a useful tool to manage risk and lock in profit at specified price levels. It can also be used in conjunction with other order types, such as stop-limit orders, allowing you to have more control over your positions.
Please note that these are not OCO orders. For example, if your stop-limit order is hit while you also have an active take-profit limit order, the take-profit limit order remains active until you manually cancel it. You can set a take-profit limit order under the [Stop Limit] option in the order entry field.
Take-Profit Market Order
Similar to a take-profit limit order, a take-profit market order uses a stop price as a trigger. However, when the stop price is reached, it triggers a market order instead. You can set a take-profit market order under the Stop Market option in the order entry field.
Trailing Stop Order
A trailing stop order helps you lock in profits while limiting the potential losses on your open positions. For a long position, this means that the trailing stop will move up with the price if the price goes up.
However, if the price moves down, the trailing stop stops moving. If the price moves a specific percentage (called the callback rate) in the other direction, a sell order is issued. The same is true for a short position but in reverse. The trailing stop moves down with the market but stops moving if the market starts going up. If the price moves a specific percentage in the other direction, a buy order is issued.
The activation price is the price that triggers the trailing stop order. If you don’t specify the activation price, this will default to the current Last price or mark price. You can set which price it should use as a trigger at the bottom of the order entry field.
The callback rate is what determines the percentage amount the trailing stop will “trail” the price. So, if you set the callback rate to 1%, the trailing stop will keep following the price from a 1% distance if the trade is going in your direction. If the price moves more than 1% in the opposite direction of your trade, a buy or sell order is issued (depending on the direction of your trade).
How to Use the Binance Futures Calculator
You can find the calculator at the top of the order entry field. It allows you to calculate values before entering either a long or short position. You can adjust the leverage slider in each tab to use it as a basis for your calculations.
The calculator has three tabs:
PNL – Use this tab to calculate your Initial Margin, Profit and Loss (PnL), and Return on Equity (ROE) based on intended entry and exit price and position size.
Target Price – Use this tab to calculate the price you’ll need to exit your position at to reach the desired percentage return.
Liquidation Price – Use this tab to calculate your estimated liquidation price based on your wallet balance, your intended entry price, and position size.
A video tutorial is available here.
How to Use Hedge Mode
In Hedge mode, you can simultaneously hold long and short positions for a single contract. A trader may do this if they’re bullish on an asset long-term but bearish in the short term. With Hedge mode, your quick short positions won’t affect your long positions.
The default position mode is the One-Way mode. This means that you can’t open both long and short positions at the same time for a single contract. If you tried to do so, the positions would cancel each other out. If you want to use Hedge mode, you’ll need to enable it manually like so:
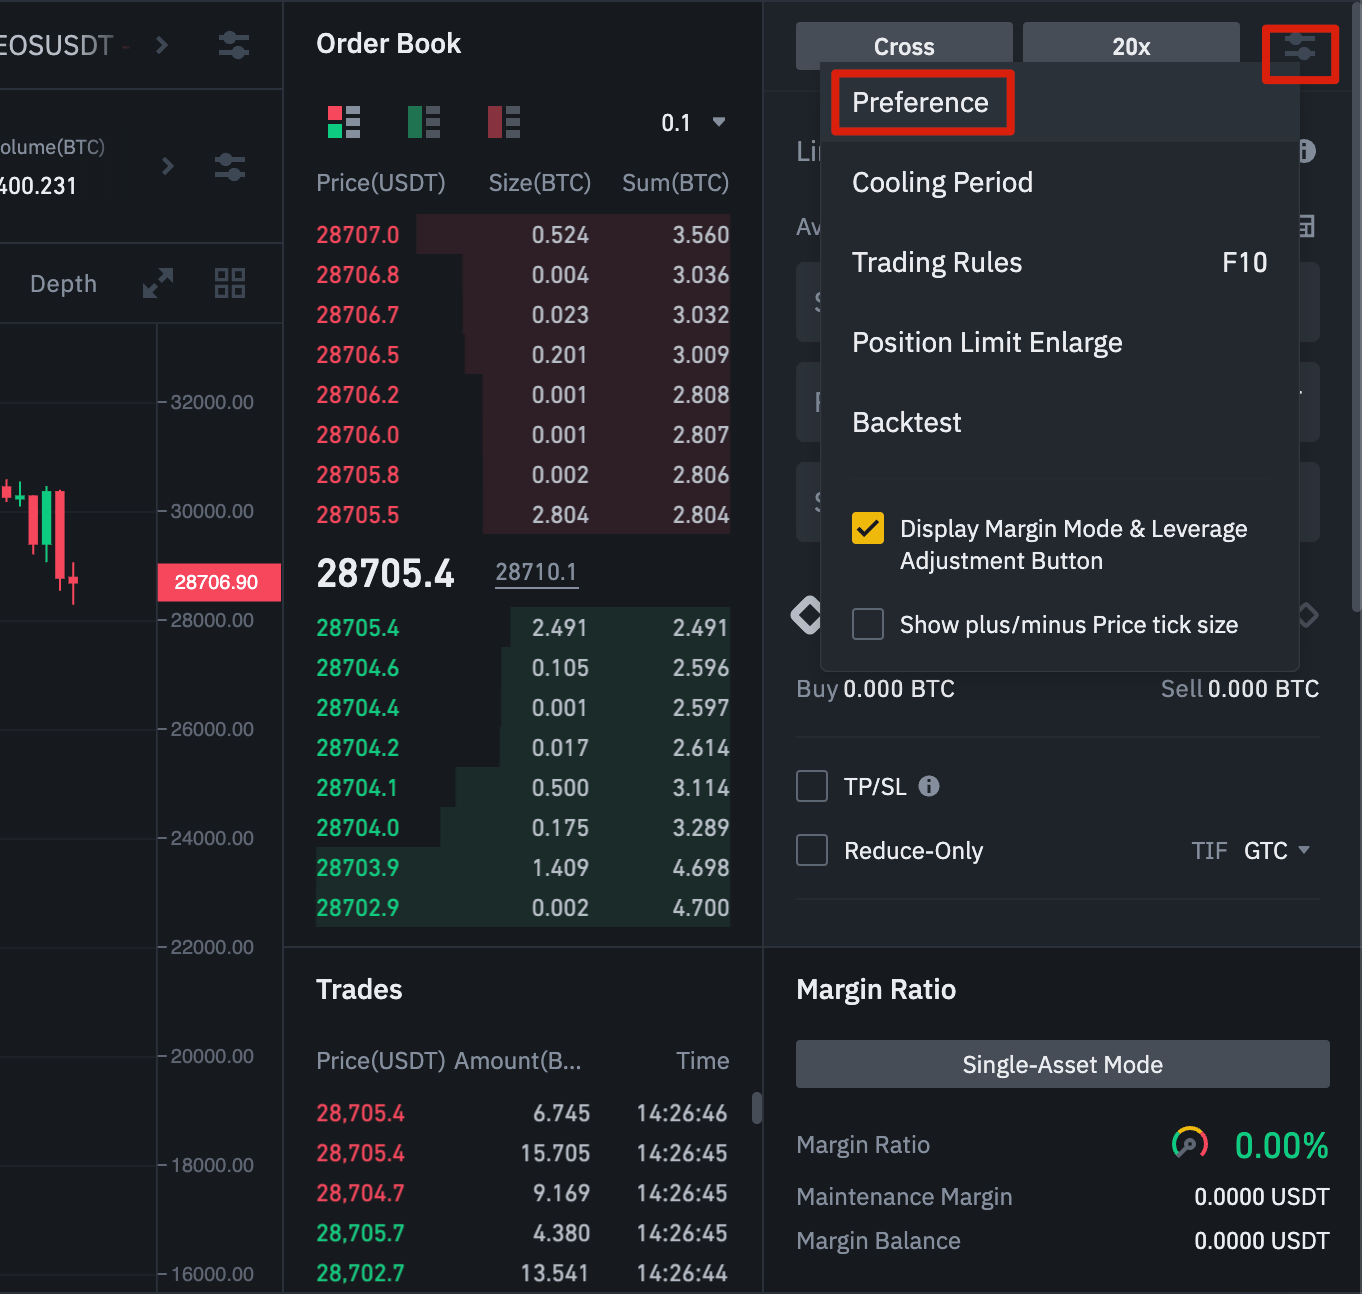
Go to the top right of your screen and select [Preference].
Go to the [Position Mode] tab and select [Hedge Mode].

Please note that if you have open orders or positions, you won’t be able to adjust your position mode.
What is the Funding Rate and How to Check it?
The funding rate makes sure that the price of a perpetual futures contract stays as close to the underlying asset’s (spot) price as possible. Essentially, traders are paying each other depending on their open positions. What dictates which side gets paid is determined by the difference between the perpetual futures price and the spot price.
When the funding rate is positive, longs pay shorts. When the funding rate is negative, shorts pay longs.
If you’d like to read more about how this process works, visit our What Are Perpetual Futures Contracts? guide.
So what does this mean for you? Well, depending on your open positions and the funding rates, you’ll either pay or receive funding payments. On Binance Futures, these funding payments are paid every 8 hours. You can check the time and the estimated Funding Rate of the next funding period at the top of the page, next to mark price.
If you’d like to check the previous funding rates for each contract, hover over [Information] and select [Funding Rate History].
What is Post-Only, Time in Force, and Reduce-Only?
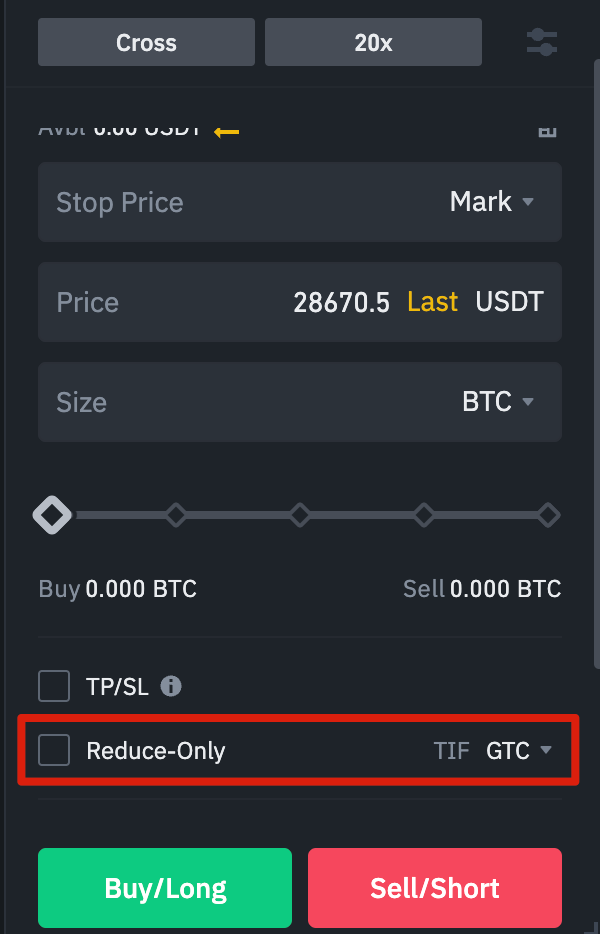
When you use limit orders, you can set additional instructions along with your orders. On Binance Futures, these can either be post-only or time-in-force (TIF) instructions, and they determine additional characteristics of your limit orders. You can access them at the bottom of the order entry field.Post-Only means your order will always be added to the order book first and will never execute against an existing order in the order book. This is useful if you would only like to pay maker fees.
TIF instructions allow you to specify how long your orders will remain active before they are executed or expire. You can select one of these options for TIF instructions:
GTC (Good Till Cancel): The order will remain active until it is either filled or canceled.
IOC (Immediate Or Cancel): The order will execute immediately (either fully or partially). If it is only partially executed, the unfilled portion of the order will be canceled.
FOK (Fill Or Kill): The order must be fully filled immediately. If not, it won’t be executed at all.
When you’re in One-Way mode, ticking [Reduce-Only] will ensure that the new orders you set will only decrease and never increase your currently open positions.
When Are Your Positions at Risk of Getting Liquidated?
Liquidation happens when your margin balance falls below the required maintenance margin. The margin balance is the balance of your Binance Futures account, including your unrealized PnL (Profit and Loss). So, your profits and losses will cause the margin balance value to change. If you’re using Cross Margin mode, this balance will be shared across all your positions. If you’re using Isolated Margin mode, this balance can be allocated to each individual position.
The maintenance margin is the minimum value you need to keep your positions open. It varies according to the size of your positions. Larger positions require a higher maintenance margin.
You can check your current margin ratio in the bottom right corner. If your margin ratio reaches 100%, your positions will be liquidated.
When liquidation happens, all of your open orders are canceled. Ideally, you should keep track of your positions to avoid auto-liquidation, which comes with an additional fee. If your position is close to being liquidated, consider manually closing the position instead of waiting for the auto-liquidation.
What Is Auto-Deleveraging and How Can It Affect You?
When a trader’s account size goes below zero, the Insurance Fund covers the losses. However, in some exceptionally volatile market environments, the Insurance Fund may be unable to handle the losses, and open positions must be reduced to cover them. This means that in times like these, your open positions can also be at risk of being reduced.
The order of these position reductions is determined by a queue, where the most profitable and the highest leveraged traders are at the front of the queue. You can check your current position in the queue by hovering over [ADL] in the [Positions tab].

Closing Thoughts
Traditional futures contracts are derivatives that give traders the obligation to buy or sell an asset in the future. But unlike traditional futures contracts, perpetual futures contracts don’t have a settlement date. Still, derivatives can be confusing for inexperienced traders, so it’s crucial to understand how these contracts work before taking financial risks. As mentioned, you can access the Binance Futures testnet to test the platform without risking real funds.
Further Reading
(Blog) Futures Articles
(Blog) What Is Long/Short Ratio and What Does It Convey in Cryptocurrency Futures
(Blog) Six Strategies to Minimize Liquidation Risks in Crypto Futures
Risk Warning: Digital asset prices can be volatile. The value of your investment can go down or up, and you may not get back the amount invested. You are solely responsible for your investment decisions, and Binance is not liable for any losses you may incur. Futures trading, in particular, is subject to high market risk and price volatility. All of your margin balance may be liquidated in the event of adverse price movement. Past performance is not a reliable predictor of future performance. Before trading, you should make an independent assessment of the appropriateness of the transaction in light of your own objectives and circumstances, including the risks and potential benefits. Consult your own advisers where appropriate. This information should not be construed as financial or investment advice. To learn more about how to protect yourself, visit our Responsible Trading page. For more information, see our Terms of Use and Risk Warning.
Cryptocurrency derivative products may be restricted in certain jurisdictions or regions or to certain users in accordance with applicable legal and regulatory requirements. This content is intended only for those users who are permitted to access and receive the products and services referred to and are not intended for users to whom restrictions apply. You are responsible for informing yourself about and observing any restrictions and/or requirements imposed with respect to the access to and use of any products and services offered by or available through Binance in each country or region from which they are accessed by you or on your behalf. Binance reserves the right to change, modify or impose additional restrictions with respect to the access to and use of any products and/or services offered from time to time in its sole discretion at any time without notification.